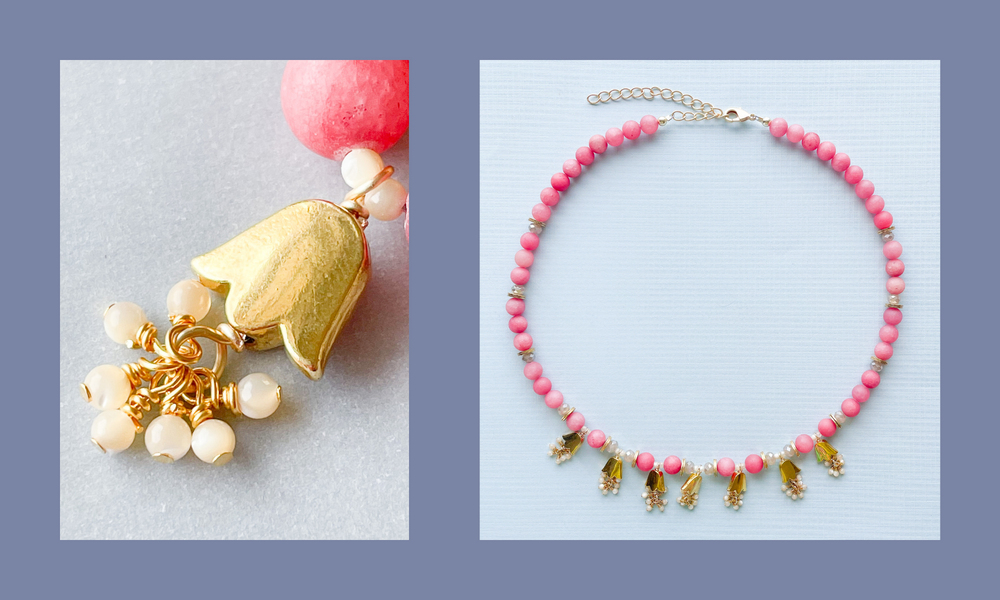

WHAT DO I NEED TO MAKE MY OWN PERIWINKLE DROP NECKLACE?
- one strand of 8mm Domino Polymer Clay Heishi
- one strand of 10mm Matte Metallic Gray Faceted Chinese Crystal Rondelles
- one strand of 3mm Faceted Silver Cubes
- one strand of 13mm Periwinkle faceted Glass Barrels
- one foot of 8mm Distressed Plated Silver Oval Cable Chain
- one pack of 2" Distressed 20G Silver Headpins
- one pack of 2mm Sterling Silver Crimp Tubes
- one pack of 15mm Shiny Silver Lobster Claw Clasps
- one pack of 6mm Shiny Silver Closed Jump Rings
- 0.018 Beadalon Bright Stringing Wire
- Crimping Plier
- Designer Wire Cutter
- Round Nose Plier
STEP-BY-STEP INSTRUCTIONS FOR MAKING A SIMPLE TWO-TONE WOOD + PEARL NECKLACE
STEP 1: CUT YOUR BEADALON
For this necklace, we'll be using several partial bead strands. We made this necklace approximately 18" not including the chain. extender. We cut about a 25" segment of Beadalon wire, giving us plenty of room for crimping and switching up the design. Simply use your wire cutters to snip the Beadalon where you would like, and remember that having extra is always better!
STEP 2: CREATE YOUR CHARMS
For each charm you'll need a headpin, periwinkle barrel, silver cube bead, and a closed jump ring. You'll need a pair of Round Nose Pliers, and a Wire Cutter. String the periwinkle bead directly onto the headpin, followed by a cube bead, and then create a loop that you will string your closed jump ring on to. For help, or a refresher on wire-wrapping, click here.

STEP 3: STRING YOUR BEADS / DESIGN
Before stringing, we recommend using a piece of scotch tape to prevent the beads from sliding off of the wire without creating a permanent closure. A design like this one is a great example of when stringing from the center of the necklace might be beneficial. This means we start with the pattern in the middle, and then can add from either side, instead of stringing a long segment of gray crystal, then the middle pattern, then crystal on the other side to match.
Because we have created "charms" from beads, we want to string the jump rings they are on just like beads in the design.
STEP 3: CRIMP
Once your design has been strung, choose one side to crimp off first. Secure the opposite end of the necklace with scotch tape. String on a 2mm Crimp, followed by a 6mm Jump Ring. Loop the beadalon wire around the jump ring and back through the crimp. String it through several of the wood rondelles as well. The jump ring should be able to move and turn, but still secure.
Hold the jump ring in your non-dominant hand, and pull the tail of the beadalon (through the crimp and several beads) to tighten and adjust. Next, use your crimping plier to flatten the crimp bead on the beadalon. Once secured, use your wire cutters to snip off the excess beadalon cord.
At this point, prepare your chain extender by cutting the chain to size and opening an end link with crimping pliers and/or flat nose pliers. We used about 3” of chain, but the length can be adjusted depending on your preference.
For the other side, you'll repeat the process, but creating a secure loop becomes a little more tense since the first side of your necklace is already secure. For this side, you'll only need a crimp and your lobster claw clasp.
For a quick reminder on how to crimp, check out the video below. For an in-depth tutorial, complete with step-by-step pictures, check out our Crimping on Beadalon LEARN page here.