In this video tutorial with step-by-step instructions, you’ll learn how to make memory wire bracelets, everything from the size of memory wire bracelets, design ideas, and of course our video tutorial on how to make this project. This is such a fun, easy beaded bracelet project perfect for beginners. You really don't have to have any jewelry making experience in order to be able to put one of these together. Throughout the tutorial, I am going to answer some frequently asked questions about memory wire. You will also find step-by-step instructions for making DIY memory wire bracelets as well as a video tutorial. I hope you find this helpful! Please let me know what other jewelry making projects you’d like me to talk about in the comments section below.
About memory wire
Before we start, let’s talk a little about memory wire. Memory wire is a little different from other types of wire for jewelry making. Its shape and properties make it fun for unique jewelry making projects. In our shop, it comes in silver or gold.
What is memory wire?
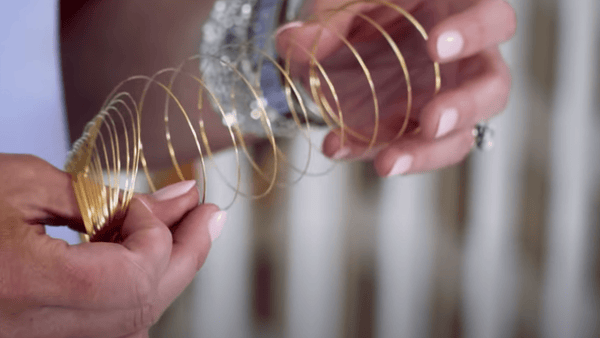
Memory wire is a steel-based wire that is pre-shaped into coils. It’s a strong wire which makes it fun to work with for jewelry making projects. Since it is a stronger wire, it takes a little more effort when working with pliers to manipulate the wire. The benefit of this stronger, coiled wire is that it stays in place and holds its shape well. Memory wire will continue to hold its shape even after beads and charms are added. This allows us to easily create a wrap bracelet with the look of bangles while using one length of wire.
What can I make with memory wire?
In this tutorial, we are making a wrap bracelet from memory wire. Bracelets are the easiest and most common thing to make with this type of wire, but it’s not the only project you can make. You can make earrings and rings as well. Memory wire comes in different coil sizes for these different purposes. I have seen people make hoop earrings out of this bracelet sized memory wire and it works great for that!
How does memory wire work?
Memory wire comes in a package that contains one long length of wire that has been shaped into multiple coils. Usually, a package contains around 30 coils. The coils can be different sizes and the wire comes in different gauges as well. The coils can be easily separated, kind of like a slinky. That allows you to cut off the desired number of coils for your project.
In our store, we carry the most common size memory wire. The wire has a diameter (thickness) of .025 inches or .655mm which works well for most beads you would want to use for this project. The size of the coils does influence the size of your bracelet. The size we carry is designed to fit the average wrist size of an adult. Take into consideration if you have larger or smaller wrists when planning this project. Because memory wire holds its shape, it is good for many wrist sizes. As a jewelry maker, this can come in handy when making jewelry to gift to friends and family as it takes the guesswork out of sizing.
Memory wire bracelet designs
I love designing memory wire bracelets because they are so versatile. In today’s tutorial, we are going to make a brightly colored bracelet stack, but we also have a beautiful kit on our site that features a more neutral color pallet.
To design your bracelets, keep in mind the nature of memory wire. Since it is a coil, you will end up with a wrap bracelet that looks like a stack of bangles. This is something to consider when coming up with your design.
I like to work in sections, creating a color-blocked pattern with different types of beads. That creates a nice looking variety in the bracelet stack, without having to work within a strict design. It keeps the design from getting too random with too many things going on at once.
Memory wire bracelets are a great way to use up leftover beads that you may have in your stash.
Because the wire stays coiled as you string your beads, it is easy to see how the design is coming together as you add beads and adjust if necessary.
You can layout your design on a bead mat before you start stringing. Since the memory wire coils, we will string in one direction. So, if you’d like to feature a center design, you will want to lay out the beads first to plan your design.
Add charms
One idea for a fun design element for these wrap bracelets is to add charm to the top that will hang down across all the bangles. This is easy to attach to the end loop using a headpin and a jump ring. You can even hang charms throughout the design to add movement.
What beads work best for memory wire bracelets?
One of the fun things about these bracelets is you can design them in many ways. You can make a super neutral stack with black and brown and tan that you can wear with anything. I'm also going to show you a variation that has more bright colors that is perfect to brighten up any day. It's going to incorporate some polymer clay beads which are super lightweight. You can really have fun with those variations.
When working with memory wire, you’ll want to stick to medium-sized beads. As the coil size is set by the wire, the size of the bead will impact the fit of the bracelet. Another thing to consider when choosing beads for memory wire is the weight. Working with beads that are more lightweight will help the wire hold its shape. In this tutorial, I’ve chosen to use polymer clay beads. These beads are great for use with memory wire because they are very lightweight.
Here are some of my favorite beads to use when designing memory wire bracelets:
Need help choosing beads for this project? DM us on Instagram!
Supplies you’ll need for making memory wire bracelets
Heavy-duty wire cutters (DO NOT use your everyday wire cutters for this project.)
Beads of your choice - see above list for beads that work well
Step-by-step instructions
Step 1: Prepare your wire
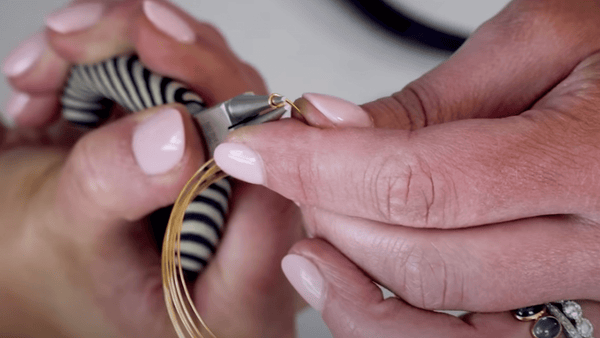
To start, we will cut our memory wire. Since the package comes with around 30 coils inside, we will want to cut off the number of coils we want to work with. The number of coils you cut will turn into the number of wraps are in your bracelet. I typically use either 5-6 coils or 3-4 coils. Those are my two favorite lengths. And you do not want to use your good wire cutters on this because this wire will mess them up. You want to use kind of like toolbox wire cutters from the garage or so. And for the sake of time, I'm going to make you guys a little bit of a shorter one. Use my round nose pliers or you could even use needle-nose pliers to curl up the end.
Since this is a steel-based wire. It's going to be a little bit tougher to work with. You really want to give it some elbow grease there and turn that in.
Step 2: Design your bracelets
As you can see in the video, I am designing my bracelets as I go. I’ve picked out the beads I want to work with that I know will be appropriate for memory wire and look good together, but I haven’t set out a specific design ahead of time. I like to work kind of in blocked sections, which keeps my design from getting too busy to the eye. As I mentioned above, if you’d like to plan out your memory wire bracelet design ahead of time, that works great too. A bead mat will be helpful in lining up your design.
Step 3: String your bracelets
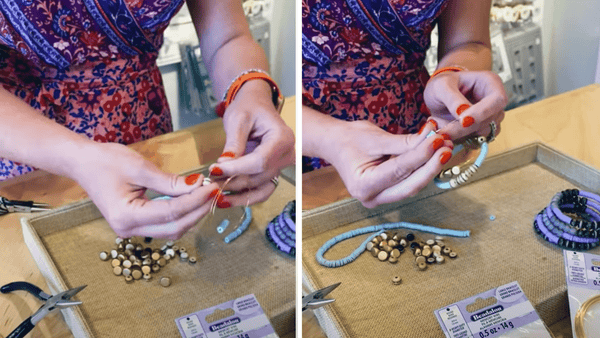
Now we're ready to start stringing our beads. Since I am using polymer clay beads that come on a strand, I'm going to start by opening up the end of my polymer clay strand. And I'm ready to just start transferring my beads on. With these beads, I always want to pull several off at a time and transfer them onto my memory wire.
Since I am designing as I go, I’ll add several inches of the polymer clay and then a couple of inches of accent beads.
And you can see where you wouldn't want to string these little tiny polymer clay beads one by one, you really want to keep them on that string until you are ready to transfer them. But it goes so much faster if you can string a clump at a time.
Step 4: Add accent beads
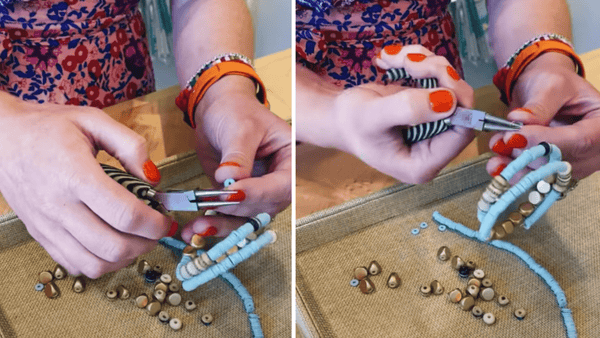
OK, so then maybe I'm ready to string some gold wood beads. String a little section of those. And our memory where it comes in silver and gold, we just carry it in one gauge, but this gauge is pretty multipurpose. This is the bracelet size, but I've also seen people use this to make hoop earrings, and it's very versatile for that. Some more aqua. And you can really have fun with the different things that you add in here, you could even hang charms throughout the pattern and that would look awesome too. Get a lot of movement out of that.
And again, just working in very random blocks, because it's is going to look awesome when it's all wrapped around our wrist. And then go back to my gold, wood beads, these are triangular gold wood beads, they're so popular. I love the shape. And then a little bit more aqua.
Step 5: Finish your bracelets
When I get to the end of stringing my beads, I'm just going to leave myself probably about ½ inch to 1/3 inch or so of memory wire. That way, I have some room here to curl the end of the wire over as I did for the beginning of the wire. This step will finish the bracelet and keep all the beads on the wire.
Use round nose pliers to grip the end of the wire about an inch in from the end and just curl, curl, curl until it gets nice and snug. Now, double-check to make sure there aren’t any sharp edges of the wire exposed.
Finished project: Memory wire bracelets
And there we have a DIY memory wire wrap bracelet. To wear the memory wire bracelet, put it on by wrapping the coils around your wrist. I just love these bracelets because they make such an awesome bracelet stack.
As always thank you for watching and reading my jewelry making tutorials. Let me know what projects and ideas you are looking for in the comments. This memory wire bracelet project is one of my favorites and I hope you enjoy this simple project as much as I do!