
Today in the Beads, Inc. jewelry making studio we are going to be making our own beaded tassels. Creating tassels out of beads is so easy and they really create a stunning look. My easy video tutorial will teach you how to make these tassels. Follow along with the step-by-step instructions below to make your own!
I’m using Chinese crystal beads, some Czech glass beads and griffin silk cord to create these DIY tassels. Once you have this technique down, you can use beaded tassels to make earrings, a simple necklace as a pendant on a chain or a statement necklace with multiple tassels.
Materials and supplies
Here are the materials you’ll need to create these beaded tassels:
- Griffin silk cord with the needle attached
- 3-4 strands of beads of your choice: three to four millimeters
- 20-gauge gold craft wire
- Bead cap or bead cone with a deep well in it
- Super New Glue or some type of fast drying super glue
- A jump ring
- Wire cutters
- Round nose pliers
Instructions for making a beaded tassel
Step 1: Prep your silk cord string.
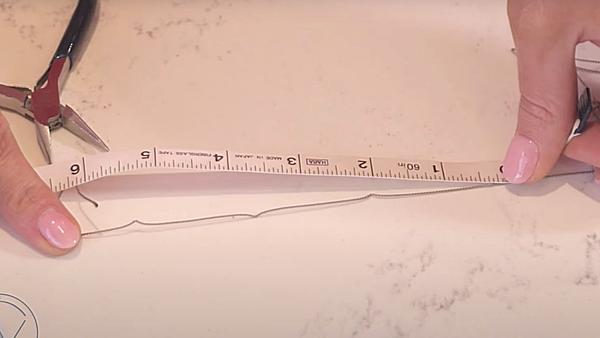
So let's get started. Going to start by tying the knot at the very end of our Griffin silk cord. Next will want to determine the length of our overall tassel, keeping in mind that if we want a three-inch tassel, each section that we're getting ready to string will be approximately six inches long, meaning that we're going to double each section over to create that finished length.
Step 2: Begin stringing your tassel segments.
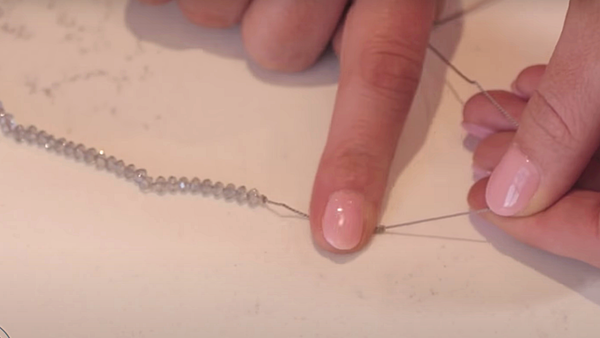
So keeping that in mind, I'm going to go ahead and do a six-inch section so we'll string our crystals, pulling them off of the fishing line that they come on and transfer them on to our Griffin silk cord a few at a time until we've created a six-inch section.
Step 3: Knot each segment and create the next beaded segment.
Once we have six inches of our crystal strung, we'll tie a knot above the last bead. And it doesn't have to be right on top of it. It can be maybe, oh, a quarter of an inch or so above it so that there's a little bit of room for these crystals to move in between the two knots. Next will tie another knot just about half an inch to an inch after that, knot to begin our next section. It can be kind of approximate - the idea is just not to waste too much silk in between sections. Now you'll start stringing your next six inches of crystals. So we're going to do the same thing on this next section tie another knot, just slightly above the last crystal to give a little bit of slack to that section, about a quarter of an inch or so after the last one. We want to make sure the crystals can still move inside of this section. That will give us wiggle room that we will need when we go to fold the sections in half later. And then we go on to our next section and tie another knot to begin that next section.
Step 4: Add glue to secure the beaded segments.
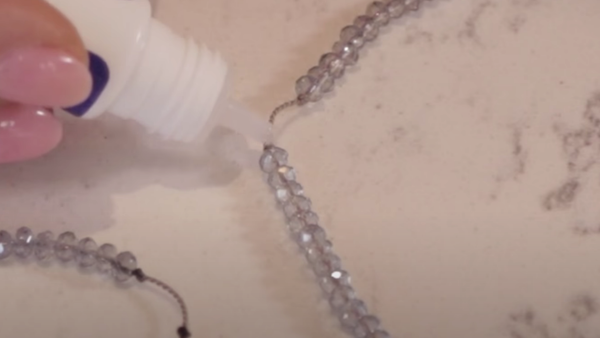
So you'll see where we're starting to come along with several different sections that are going to make up the parts of our tassel. Now that we have all of our sections strung on our silk cord, we are going to put a tiny dab of Super New Glue on each knot so that we don't have to worry about that not fraying or coming undone once the tassel is put together. So I'm going to use Super New Glue. You can also use another type of fast drying glue. We want to put the tiniest dab of glue possible so that it doesn't get all over crystals, as it tends to be kind of runny.
So you're just going to move quickly along each knot just dropping the tiniest amount of glue possible. And once we've done that, we're going to give it just a few seconds to dry. And then we can go back with a pair of sharp scissors or wire cutters and we're going to snip off our excess in each section. And cut the sections apart, so we should have just these little crystal worms, as I like to call them.
So I have four segments now, but you could keep on going and make as many of these as you want to, depending on how thick you want your tassel and how many strands you want in it. So if I make four little worms, it's going to make me an eight strand tassel. So those are all done and they should all be the same length.
Step 5: Combine your beaded segments to create the body of the tassel.
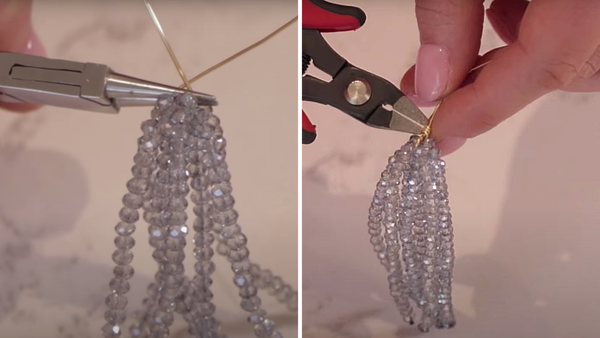
And next, I'm going to use a piece of my 20 gauge gold craft wire. We're going to cut a piece a few inches long. This is way longer than I need, but it's always easier to have too much than not enough, especially if we decide after the fact that we want to embellish above our tassel or something like that.
So we're going to use our round nose pliers, hold this closer to one end than the other, make this wrapped loop, leave it open like this right here. Next, we're going to take our little crystal worm sections that we've made, fold them in half and make sure that we fold them in half pretty accurately so that half of each side hangs over our wire piece and add each one here to our gold loop that we've created. Three and four.
Step 6: Secure the tassel with wire.
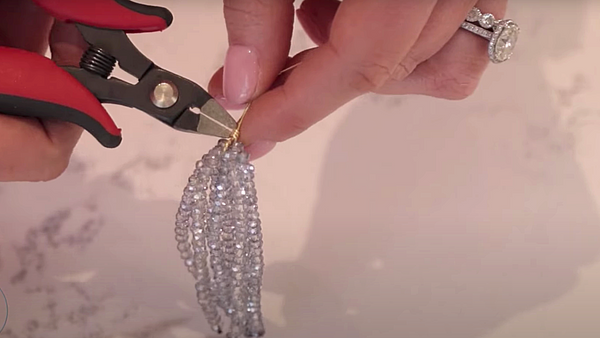
Once, they've all been attached, we can use our round nose pliers, hold the pliers over that loop just to keep the shape while we're twisting. Using a nice firm hold, wrap the excess wire around itself two or three times, securing the wires and the loop that holds the beaded segments.. Then, snip off the excess wire using your wire cutters.
Step 7: Add a bead cap and embellishing beads.
Next, we're going to add our bead cap the top. And that's going to sit down over it, holding everything in place and really finishing off our tassel. You can always include a bead or two on top of your bead cap to add a little embellishment before we create our loop as the final step in making these DIY tassels.
Step 8: Create a loop on top of the tassel to finish it.
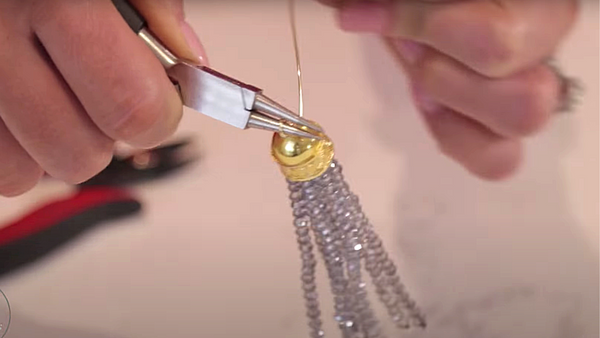
The next step is to create a loop at the top of our tassel. Creating that loop will allow us to easily use this tassel in a design, like a necklace or earrings. Who doesn’t love a pair of beaded tassel earrings?
To create the loop, we're going to use our round nose pliers again, hold it slightly above the top of that bead with a little bit of breathing room. Wrap this away from us and back towards us. It's much like tying up an earring at this point. And at this point, we can add a jump ring. And that's what I'm going to do, because sometimes I like to make these into pendants, that way it’s easy to use on a necklace. And just wrap this around several times. And then we're ready to snip off our extra. So that is a simple crystal tassel on silk.
That completes our beaded tassel! These tassels are such a fun and easy jewelry making project.
Here are a couple of common questions people have when it comes to making beaded tassels:
How can I design my own tassels with beads?
We can have a lot of fun with creating different patterns with our glass beads that we incorporate. Have fun with creating different styles. I like to create a color-block style. Or use a patterned bead to give the tassel some variation and interest. Designing tassels can be a lot of fun because there really are so many ways to get creative with them.
What can you make with beaded tassels?
You can make them into charms or pendants. That is nice to do because then you can use the tassels to create jewelry very easily. A nice tassel makes a great simple pendant on just a piece of chain to create a fun and elegant necklace. Tassels are also great for creating statement necklaces because you can layer them up to add drama. They are very interesting when used in jewelry making. You can also use tassels to make a nice pair of earrings. I love a good pair of beaded tassel earrings.
What kinds of beads can you use to make tassels?
Pearl beads make a beautiful beaded tassel. The unique smooth shimmer of pearls is just beautiful in a design like this.
Many people like to make tassels with seed beads. That creates a more delicate tassel that can be used in many ways. You can use the same technique explained in this tutorial to make a seed bead tassel.
I like to make wooden beads into tassels as well. Wooden beads are lightweight so they make great tassels for necklaces.
Thank you for watching and making jewelry with me!
Thank you for watching my video tutorial and following along with my step-by-step instructions. I hope you learned a thing or two about making beaded tassels through this jewelry making tutorial. Let me know in the comments what other techniques you’d like to learn and I will make one of my videos.


