


In this jewelry making video tutorial, you will learn how to make DIY mask necklaces, or lanyards, in three different ways. These are all very simple jewelry making projects that beginners and advance makers will enjoy creating. Feel free to follow along exactly with any of our example designs, or create your own version with different beads.
What is a mask necklace?
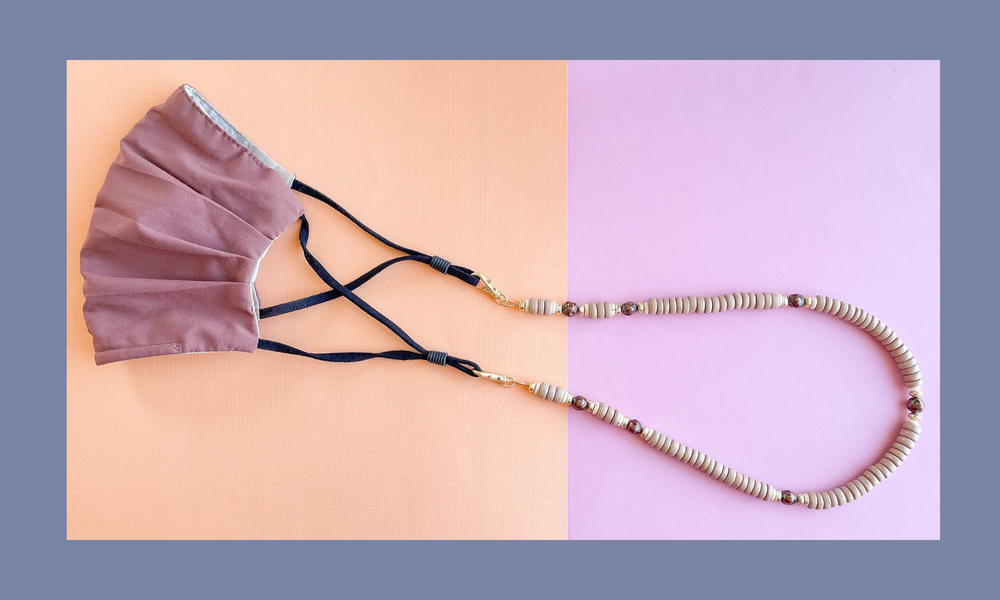
A mask necklace, sometimes called a mask chain or mask lanyard, is a mask accessory that makes wearing a mask more convenient, fashionable, and personalized. It attaches to your mask like a sunglasses strap while you’re wearing the mask. And the best part is when you’re not wearing your mask, the necklace allows the mask to hang around your neck – how convenient! Since the beginning of the COVID-19 pandemic last year, mask chains have gotten super popular, and we've gotten a lot of requests for a tutorial on creating these!
There are a lot of benefits of using a mask necklace as you wear a mask:
- Keep track of your mask so you won’t lose it
- Prevents you from dropping the mask on the ground
- Makes it easier and faster to take your mask on and off
- Allows you to hold your mask when not in use hands-free
- Plus, they look cute!
How do you make a mask necklace?
Making your own DIY mask necklace allows you to get creative! You can add more personality to your mask through the accessory by mixing and matching with your masks. You can also add letter beads to spell out a name or monogram. Show us your mask necklace ideas by tagging us on social media – we always love to see your projects.
You can also wear these as a necklace when not in use with a mask by connecting the two clasps together – double duty for your jewelry box.
Let’s get started on this fun project! Each mask necklace, chain, or lanyard has its own set of step-by-step instructions and supply list below. Anne shows you how to make all three in this video!
How to Make a Beaded Mask Necklace
A beaded mask necklace follows the exact same protocol as a standard beaded necklace follows, but instead of a jump ring on one end of the beadalon, you'll double up on clasps so each end has a clasp.
Supplies for making our beaded mask necklace:
Click each supply below to learn more.
- Polymer clay beads – we are using the Gray Sweatpants color
- Gold hematite
- Crimp beads
- Crimping pliers
- Round nose pliers
- Brushed gold lobster clasp
- Clear tape
- Wire cutters
Step-by-step Instructions for making a beaded mask necklace

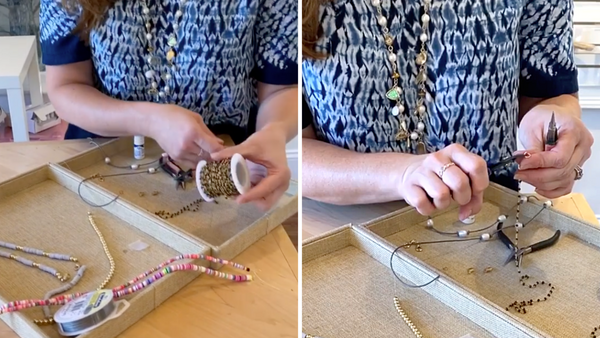
Step 1: measure and cut your wire
To start, we will measure our wire to the length we want the mask lanyard to be. For adults, I recommend making them 18 inches to about 20 inches and children about 12 to 18 inches. For this necklace you will want to add around 4-6 extra inches to your wire. You can hold the wire up as if you are wearing it to test the length before you cut. Use wire cutters to cut the desired length. Put a piece of tape around one end of the wire. That will stop the beads from falling off as you string, making it easy to quickly add beads.

Step 2: String your beads
In this design we are using our favorite gray sweatpants polymer clay beads and our six-millimeter gold hematite. The polymer clay beads are very lightweight, so they are perfect for these lanyard necklaces. For my design, I am alternating sections of grey clay beads with a few gold hematite accent beads in between. I just kind of eyeball the gray sections so they look like they are all the same size. String the beads in sections placing the gold accent beads between the sections of grey beads.

Step 3: Attach the clasps and finish the necklace
To finish the beaded mask necklace, we are going to attach lobster claws using crimping beads. The lobster claw is what will allow you to clip the necklace on to your mask. One you get to your last few beads, string on a crimp bead and then the clasp. Then you are going to take your wire and string back through the same crimp bead.
You want to make that loop that is created by going back through the crimp bead pretty small. Then, use crimping pliers to press on that crimp bead until it is flattened. That is what will hold those wires in place and keep the necklace together. Now we have completed one side of the necklace and we will finish the other side.
To finish the other side, start by sliding all my beads down so they are snug against the crimp bead you just finished. Remove the tape you had on the second end to stop beads from coming off. We are going to do the same thing on this side to finish the necklace.
String a gold crimp bead on and then one more lobster clasp. Then, string the wire back through the crimp. And I like to go back through a couple of beads just to give you a little tension to get that wire tight. So, we'll pull that down tighten up our wire and we will flatten that crimp bead. Now our wires and clasps are held securely in place.
Last, we will cut off the excess wire with our wire cutter on both sides.
How to Make a Mask Chain (with Chain)
Another mask necklace variation is the mask chain. This mask chain is very easy to put together. For our design I've decided to use our rosary chain. The simple, yet beautiful look of this chain will make the perfect accessory to a mask. We have a bunch of different colors available on our website.
Supplies for Making a DIY Rosary Mask Chain:
Click on each supply to learn more!
Step-by-step Instructions for Making a Rosary Mask Chain
Step 1: Cut the chain
Just as we did for the first necklace, our first step is to cut the chain to the desired length. We are using 18 inches of chain for this mask necklace.

Step 2: Attach the clasps using jump rings
To attach the clasps, we are going to use jump rings to connect the chain to the clasps. Using two pairs of pliers, twist open a jump ring. Then, put the ring through the chain and the the clasp. Then, do the same thing on the other side to attach the clasp to that side as well. The clasps are what you will use to attach your mask.
And now your mask chain is ready to wear!
How to Make a Knotted Leather and Pearls Mask Lanyard
For the third style of mask lanyard, we are going to make a beautiful knotted leather necklace accented with pearl beads. I used our one point five-millimeter leather and knotted some large holed pearls on it. For this one, I used swivel clasp. These clasps have been really popular this year and they will give some nice freedom of movement to your mask lanyard.
DIY mask lanyard supplies:
Click on each item listed to learn more.
Step-by-step Instructions for Making a Knotted Leather Mask Lanyard
Step 1: Prepare the leather
Prepare the leather by measuring our your leather. You'll need about 18 inches for the mask plus about 8-10 inches for knotting and attaching the clasps.

Step 2: Add your beads
Add your beads of choice and secure with your favorite knots. To learn more about leather knotting, view our quick video tutorial by clicking here.

Step 3: Attach your clasps
These swivel clasps are great and so easy to use with leather. I'm just going to tie on the swivel clasp with a barrel knot. To create the knot, I'm going to take the end of my leather and wrap around my main necklace leather two times and then back through those wraps (see video above for visual!)
Then, do the same thing to attach the clasp on the other side.
So I'll go around the leather two times and pull that knot tight. For the leather, I do recommend a little dab of superglue and then you can cut the ends nice and short. And there you have three fun and easy mask necklaces.
Thank you for visiting our DIY Mask Chain Tutorial! I hope this inspires or helps you to create your own version. If you do, please tag us on Instagram @beadsinccharlotte and we'll share your creation! Until next time, happy beading.


